

Enabling S3 HTTPS is a critical step to secure your static website and gain the trust of your visitors. You’ve successfully hosted a site on S3 and connected it to a custom domain, but without the padlock icon, browsers will flag your site as “Not Secure.”
While S3 static website endpoints don’t natively support HTTPS on custom domains, AWS provides a seamless and free way to achieve this. The standard best practice involves using two other powerful services together: AWS Certificate Manager (ACM) to issue a free SSL certificate, and Amazon CloudFront to deliver your content securely.
This ultimate guide will walk you through the entire process, from requesting a certificate to configuring a secure, private S3 backend.
Prerequisites
- A custom domain name managed within an Amazon Route 53 hosted zone.
- An S3 bucket containing your website files. Note: Your bucket should be configured for standard object storage. This guide will use a more secure method than the public “static website hosting” feature.
Step 1: Request a Public SSL Certificate in ACM
First, we need to get our free SSL/TLS certificate from AWS Certificate Manager.
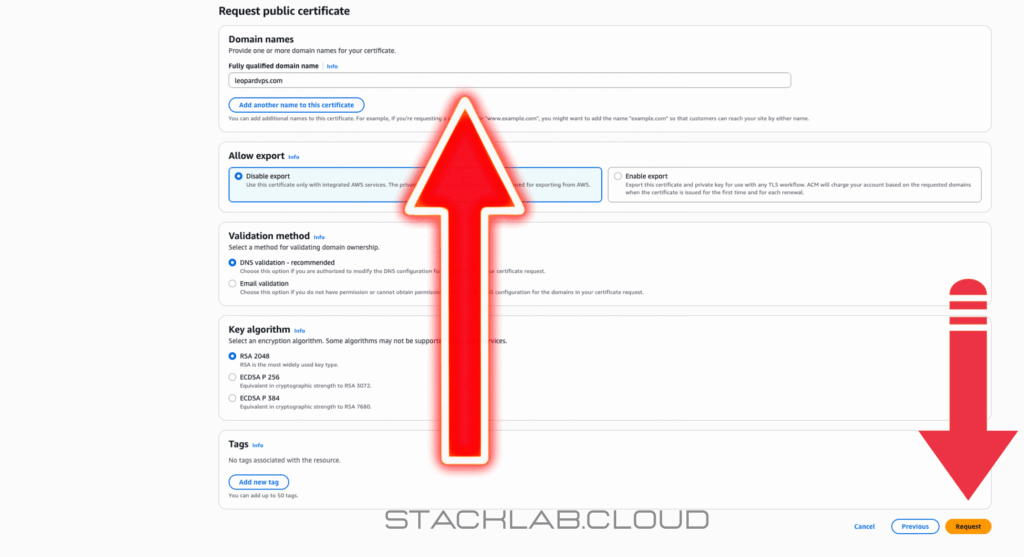
- Navigate to the AWS Certificate Manager (ACM) console. Crucial: You must switch your AWS region to Europe (Ireland) eu-west-1. CloudFront requires certificates to be in this specific region.
- Click the “Request a certificate” button.
- Ensure “Request a public certificate” is selected and click “Next”.
- In the “Fully qualified domain name” field, enter your root domain name (e.g.,
leopardvps.com). - Click “Add another name to this certificate” and enter a wildcard version of your domain (e.g.,
*.leopardvps.com). This will secure all your subdomains, like `www`. - For “Validation method,” choose “DNS validation”. This is the easiest method since you are using Route 53.
- Click “Request”.
Step 2: Validate Your Domain Ownership
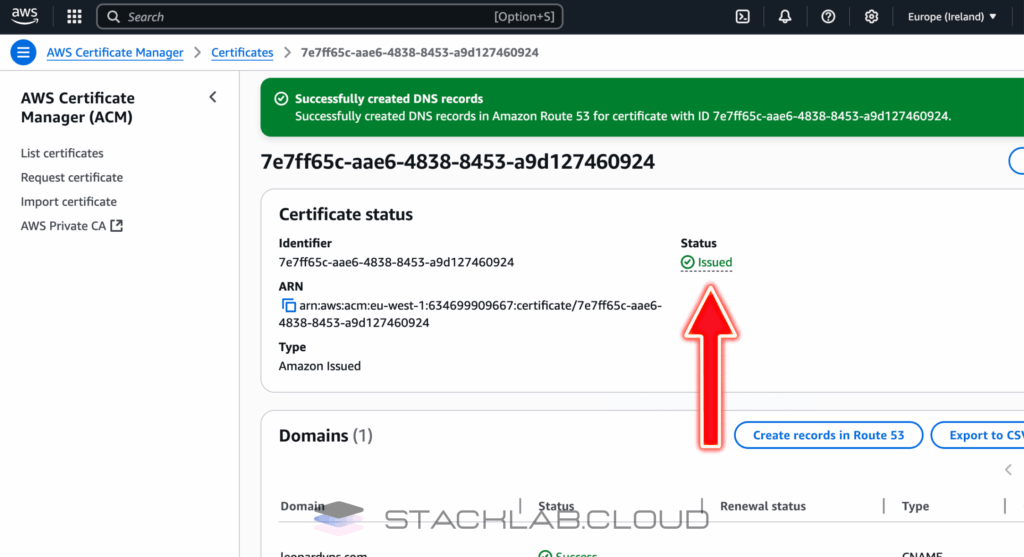
ACM needs to verify that you own the domain. Since you are using Route 53, this is incredibly simple.
- On the next screen, you will see your certificate request with a “Pending validation” status.
- Expand the details for your domain. You will see a blue button that says “Create records in Route 53”.
- Click this button. A confirmation screen will appear. Click “Create records” again.
AWS will now automatically add the necessary CNAME records to your Route 53 hosted zone. This validation process can take anywhere from a few minutes to an hour. You can refresh the page periodically until the status changes to “Issued”.
Step 3: Create and Secure a CloudFront Distribution
CloudFront is the Content Delivery Network (CDN) that will sit in front of your S3 bucket. It will handle the HTTPS connection and lock down your bucket so it’s no longer public.
- Navigate to the CloudFront Console in AWS.
- Click the “Create a CloudFront distribution” button.
- In the “Origin domain” field, select your S3 bucket from the dropdown list. It should populate with the bucket’s REST API endpoint, which looks like
your-bucket.s3.your-region.amazonaws.com.- Important: Do NOT use the old static website endpoint URL. The REST API endpoint is required for the next step.
- Now, we’ll secure the connection. Under Origin access, select “Origin access control settings (recommended)”.
- Click “Create new OAC”, accept the default name, and click “Create”. This ensures only CloudFront can access your bucket’s contents.
- A blue box will appear with a bucket policy. Click the “Copy policy” button. Go to your S3 bucket > Permissions > Bucket policy, click Edit, and paste this policy in, replacing any existing one. This grants CloudFront permission to get objects from your bucket.
- Scroll down to “Viewer protocol policy” and select “Redirect HTTP to HTTPS”.
- Under “Settings,” find the “Alternate domain name (CNAME)” field and add both your root domain (e.g.,
leopardvps.com) and yourwwwsubdomain (e.g.,www.leopardvps.com). - For “Custom SSL certificate”, select the certificate you just created in ACM from the dropdown menu.
- In the “Default root object” field, enter
index.html. - Click “Create distribution”.
It can take 5-10 minutes for AWS to deploy your new CloudFront distribution.
Step 4: Update DNS Records in Route 53
The final step is to update your DNS records to point to your new CloudFront distribution instead of directly to your S3 bucket.
- Navigate back to your Route 53 hosted zone.
- Find the “A” record you created for your root domain. Select it and click “Edit record”.
- Ensure the “Alias” toggle is ON.
- In the “Route traffic to” dropdown, choose “Alias to CloudFront distribution”.
- In the text box that appears, select your new CloudFront distribution from the list.
- Click “Save”.
- Repeat this process for your `www` record if you have one.
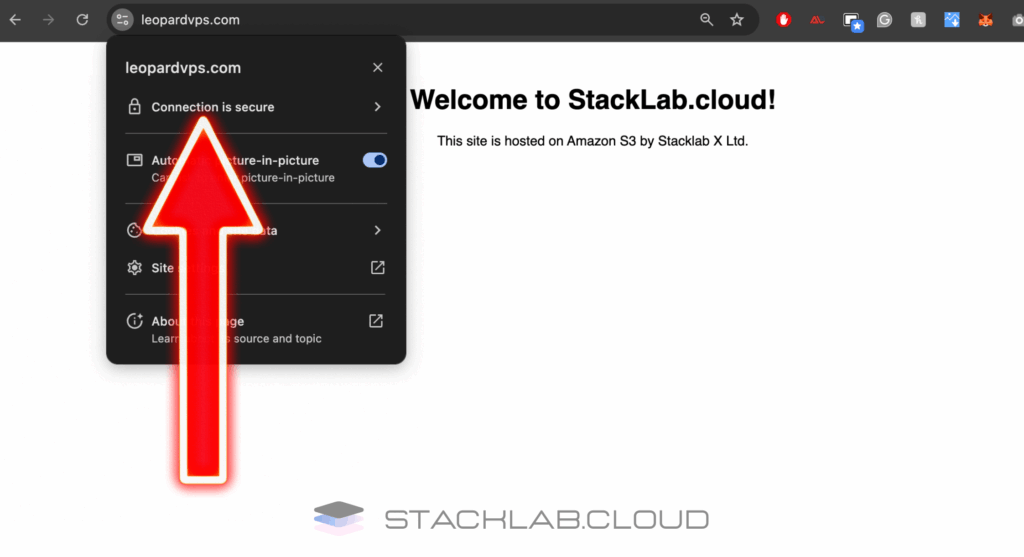
Step 5: Test Your Secure Website
Once your CloudFront distribution is fully deployed and your DNS changes have propagated, it’s time to test.
- Open a new browser tab and navigate to your domain using HTTPS:
https://leopardvps.com.
You should see your website load securely with a padlock icon in the address bar. You have now successfully secured your S3 static website!
Conclusion
You have now built a complete, professional, and secure web hosting architecture on AWS. By combining S3 for storage, ACM for free SSL certificates, and CloudFront for content delivery and security, you have a setup that is incredibly fast, scalable, and cost-effective. This is the standard best practice for enabling S3 HTTPS on static sites.
Read Next: What is AWS IAM? A Beginner’s Overview of Cloud Security
Frequently Asked Questions
Why can’t I just enable HTTPS directly on my S3 bucket with my custom domain?
Amazon S3 doesn’t support attaching SSL/TLS certificates directly to a bucket for a custom domain. While you can access your bucket over HTTPS using the default S3 URL, once you point your custom domain (e.g., www.your-site.com) to it, you can only use HTTP. Amazon CloudFront is the official AWS service used to bridge this gap, acting as a secure front door (or proxy) for your S3 content.
Why must the SSL certificate be created in the us-east-1 (N. Virginia) region?
Amazon CloudFront is a global service, not tied to a specific region. To function globally, it looks for resources like SSL certificates in a single, designated endpoint. AWS has designated the US East (N. Virginia) region for this purpose. Even if your bucket and users are in another part of the world, the certificate for CloudFront must be created in us-east-1.
What’s the real difference between the S3 REST API endpoint and the website endpoint in CloudFront?
This is the most critical technical detail for a secure setup:
S3 Website Endpoint (bucket.s3-website.region...): This endpoint is designed only for public access. It does not support the secure authentication method (Origin Access Control) needed to connect privately with CloudFront.
S3 REST API Endpoint (bucket.s3.region...): This is the standard endpoint for accessing bucket objects programmatically. It works with AWS’s permission system, allowing CloudFront to securely identify itself using Origin Access Control (OAC) and access files even when the bucket is private.
Using the REST API endpoint is essential for locking down your S3 bucket.
If my S3 bucket is now private, how can visitors see my website?
Your website visitors no longer access the S3 bucket directly. The new data flow is:
Visitor goes to https://www.your-site.com.
Route 53 points them to your CloudFront distribution.
CloudFront is the only entity with special permission (granted by the OAC policy) to access the files in your private S3 bucket.
CloudFront fetches the content from S3 and serves it securely to the visitor.
This architecture ensures your origin files are protected while your website remains fast and accessible.
I updated a file in S3, but I don’t see the change on my website. Why?
CloudFront is a Content Delivery Network (CDN), which means it stores copies (caches) of your files in various locations around the world to speed up delivery. When you update a file in S3, CloudFront might still be serving the old, cached version. To fix this, you must create an invalidation.
In your CloudFront distribution, go to the Invalidations tab and create a new invalidation for /* to clear the entire cache and force CloudFront to fetch the latest files from your S3 bucket.
Is this setup really free? What are the costs involved?
The SSL certificate from AWS Certificate Manager (ACM) is completely free. However, the other services have costs, though they are typically very low for a static website:
Amazon S3: You pay for storage and data transfer out of the bucket.
Amazon CloudFront: You pay for data transfer out to the internet. CloudFront has a generous free tier, which includes 1TB of data transfer out per month, making many static sites effectively free.
Route 53: You pay a small monthly fee per hosted zone.
For most personal or small business static sites, the total monthly cost is often less than a dollar, and sometimes zero if you stay within the free tiers.


