

You’ve successfully created your first S3 bucket, which acts as your personal storage container in the AWS cloud. Now, it’s time to take the next logical step: upload files to AWS S3 bucket.
Whether you want to store website assets, important backups, or personal documents, the process of uploading to S3 is simple and can be done directly from the AWS Management Console. This guide will walk you through every click, showing you exactly how to upload your first object to S3.
Prerequisites
- An active AWS Account.
- An existing S3 bucket.
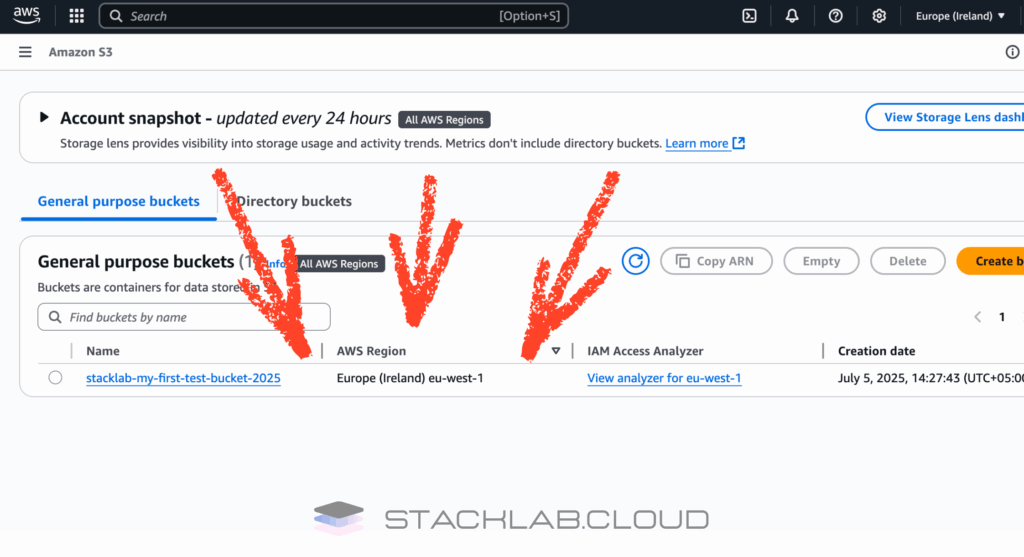
Step 1: Navigate to Your S3 Bucket
First, let’s get to the S3 bucket we created in the last tutorial.
- Log in to your AWS Management Console.
- In the main search bar at the top, type S3 and press Enter.
- From the “Buckets” list, click on the name of the bucket you want to upload files to. For example, click on
stacklab-my-first-test-bucket-2025.
This will take you inside your bucket, showing you a list of the objects it currently contains (which should be empty).
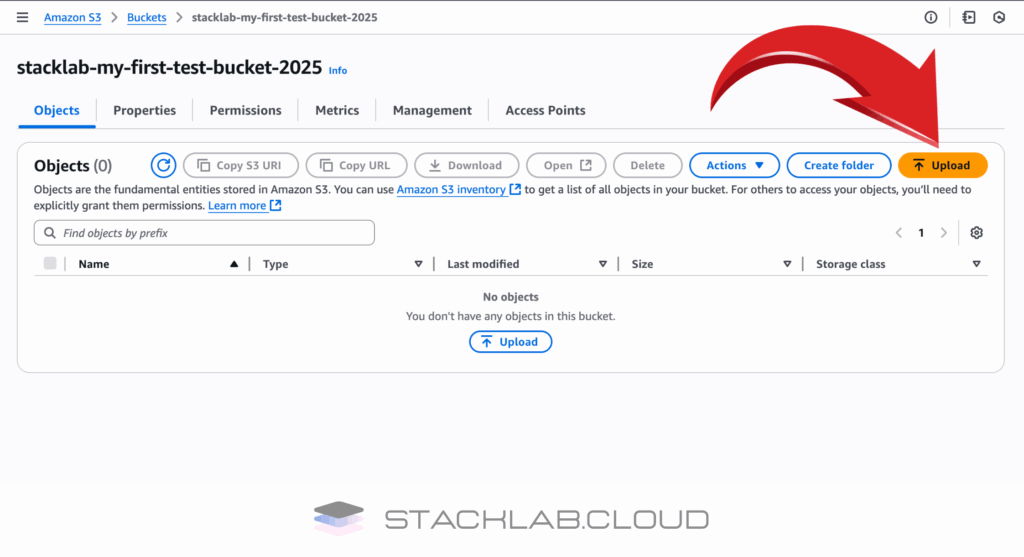
Step 2: Start the Upload Process
Once you are inside your bucket, you will see a prominent button to begin the upload process.
- Find and click the orange button that says “Upload”.
This will open the main upload interface.
Step 3: Select Your Files
The upload interface has a simple drag-and-drop area.
- You can either drag files directly from your computer into this area, or you can click the “Add files” button to open a standard file browser.
- Select one or more files from your computer that you wish to upload. For this test, a small image or a text file is perfect.
- Once selected, you will see your file(s) listed in the “Files and folders” section, ready for upload.
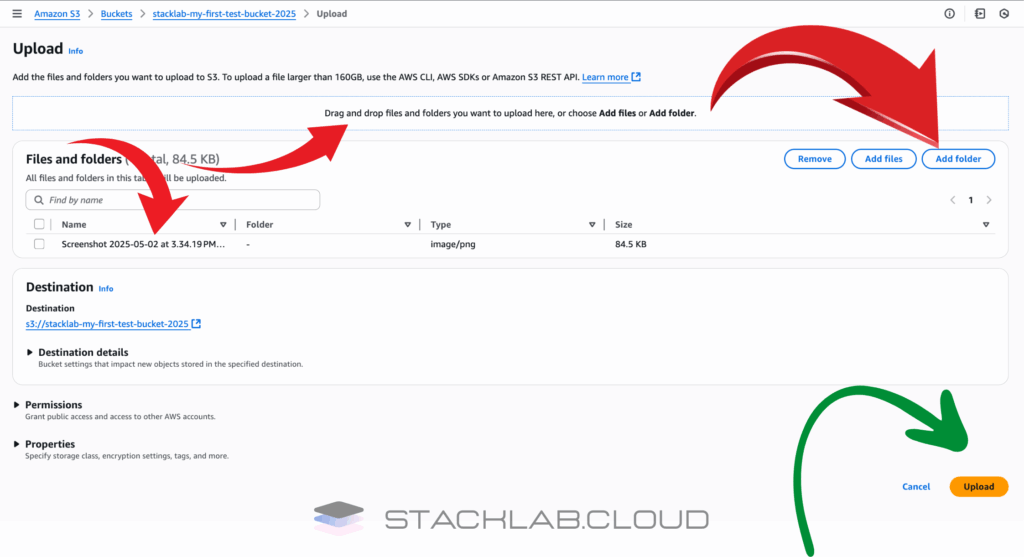
Step 4: Review Upload Settings (Optional)
For a basic upload, you do not need to change any of the default settings. Scroll down past the “Destination” details, and you will see a section for “Properties.”
This is where you could change more advanced settings like the Storage class or Server-side encryption. For now, leaving the default settings is perfectly fine. We will cover these advanced topics in a future guide.
Step 5: Upload and Verify Your File
You are now ready to complete the upload.
- Scroll to the bottom of the page and click the orange “Upload” button.
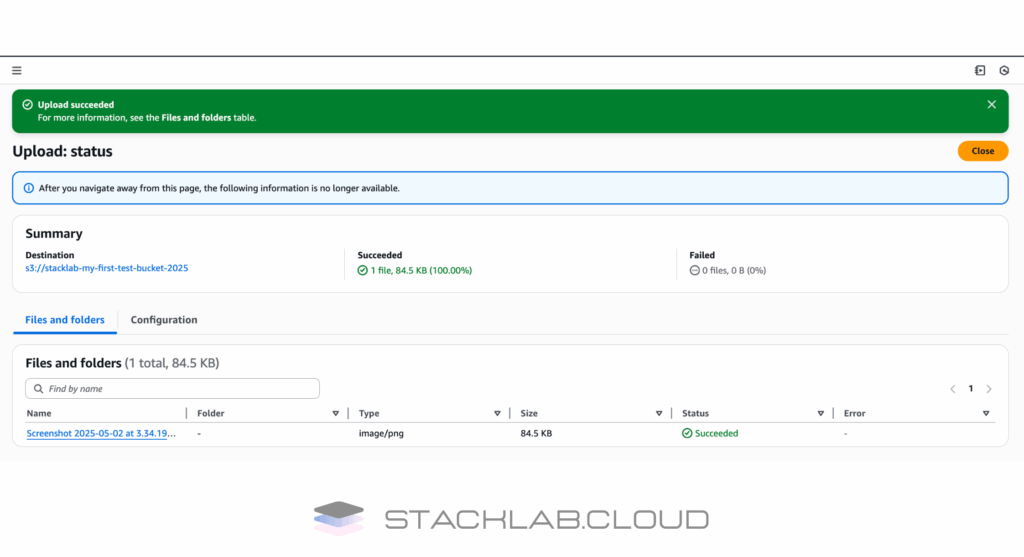
- You will see a progress bar as the file uploads. For a small file, this should only take a second.
- Once complete, you will see a green success banner at the top of the page.
- Click the “Close” button on the success banner.
- You will now be back inside your S3 bucket, and you will see your newly uploaded file listed as an object.
Conclusion
That’s it! You have successfully uploaded your first object to Amazon S3. Your data is now stored securely and durably in the AWS cloud, managed by one of the most reliable storage systems in the world.
This simple process of uploading files is a fundamental skill for managing backups, hosting website content, and building cloud-native applications. You’ve mastered another core concept of AWS.
Read Next: How to Host a Static Website on AWS S3
Frequently Asked Questions
What are the different ways I can upload files to an S3 bucket?
You can upload files to an S3 bucket in several ways, depending on your needs:
AWS Management Console: This is the easiest method for beginners. It provides a user-friendly web interface to drag and drop files directly into your bucket.
AWS Command Line Interface (CLI): For those comfortable with command-line tools, the AWS CLI offers a powerful and scriptable way to upload files. It’s ideal for repetitive uploads or for integrating into automated workflows.
AWS SDKs: If you’re developing an application, you can use the AWS SDKs (available for popular languages like Python, JavaScript, and Java) to upload files programmatically.
Third-Party Tools: Many third-party applications and services integrate with S3, allowing you to upload and manage your files directly from their interfaces.
Is there a limit to the size of a file I can upload?
Yes, but it’s very generous. While you can upload objects of up to 5 GB in a single PUT operation using the AWS Management Console, for larger files, you’ll need to use the AWS CLI, AWS SDKs, or a third-party tool that supports multipart uploads. With multipart uploads, you can upload a single object as large as 5 TB.
How do I control who can access the files I upload?
You have granular control over who can access your files in S3. Here are the primary methods:
Bucket Policies: These are JSON-based policies that you can attach to your entire bucket to define access permissions for all objects within it.
Access Control Lists (ACLs): ACLs allow you to set permissions for individual objects within a bucket.
IAM (Identity and Access Management) Policies: You can create users and groups with specific permissions to access your S3 resources.
By default, all new S3 buckets and the objects within them are private. You must explicitly grant public access if you want your files to be accessible to everyone on the internet.
What’s the difference between standard, intelligent-tiering, and glacier storage classes when uploading?
When you upload a file, you can choose a storage class that best suits your needs for cost, access frequency, and retrieval time.
S3 Standard: This is the default storage class, offering high durability, availability, and performance for frequently accessed data.
S3 Intelligent-Tiering: This class is ideal if your access patterns are unknown or change over time. It automatically moves your data to the most cost-effective access tier based on how frequently it’s accessed.
S3 Glacier: This is a low-cost storage class designed for long-term archiving and data backup. There are different Glacier options, with retrieval times ranging from minutes to hours.
Can I organize my files into folders?
While S3 has a flat structure (meaning there are no actual folders), you can create a folder-like organization using prefixes in your object keys (the file names). For example, if you name a file images/photo.jpg, the AWS Management Console will display a “folder” named images containing photo.jpg. This allows you to group and manage related objects efficiently.


