

You’ve learned about the building blocks of AWS networking: the VPC and the subnet. While AWS provides a “Default VPC” to help you get started quickly, building your own custom VPC from scratch is a fundamental skill for any cloud professional. It gives you complete control over your network environment, allowing you to design a secure and efficient architecture tailored to your application’s specific needs.
But for many beginners, the process can seem intimidating. The question of how to create a VPC in AWS involves more than just clicking one button; it requires understanding how subnets, route tables, and internet gateways work together. This is the practical application of all the networking theory you’ve learned so far.
This ultimate guide will demystify the entire process. We will walk you through every step of creating a custom VPC with both public and private subnets, ensuring you build a secure and functional network foundation for your cloud projects.
How to Create a VPC in AWS (Quick Answer)
For those looking for a high-level overview, here are the essential steps to create a functional VPC in AWS:
- Create the VPC: In the AWS VPC Dashboard, launch the “Create VPC” wizard. Choose the “VPC and more” option, give it a name, and define a primary IPv4 CIDR block (e.g.,
10.0.0.0/16). - Configure Subnets: Define at least one public and one private subnet, each in a different Availability Zone for high availability. Assign a smaller CIDR block to each (e.g.,
10.0.1.0/24for public,10.0.2.0/24for private). - Create an Internet Gateway (IGW): Create an IGW and attach it to your VPC. This acts as the front door to the internet.
- Configure Route Tables: Create a “public” route table and add a route (
0.0.0.0/0) that points to the Internet Gateway. Associate this route table with your public subnets. The main route table will remain private by default. - (Optional) Create a NAT Gateway: For resources in your private subnet to access the internet (for updates, etc.), create a NAT Gateway in your public subnet and add a route to it from your private route table.
Why Build a Custom VPC? The Importance of Control
Before we dive into the steps, it’s important to understand why you would go through this process instead of just using the Default VPC. While the Default VPC is convenient for quick tests, it’s a one-size-fits-all solution. Building your own VPC gives you critical advantages:
- Total IP Address Control: You define your own private IP address space. This is crucial for avoiding IP conflicts when connecting your VPC to your on-premises corporate network or to other VPCs.
- Custom Security Layers: You have complete control over the security architecture. You decide precisely which subnets are public and which are private, and you configure the route tables and network firewalls (NACLs) from the ground up.
- Optimized Architecture: You can design a network that is perfectly tailored to your application’s needs, placing web servers, application servers, and databases in logically separated, secure tiers.
Learning how to create a VPC in AWS is not just a technical exercise; it’s the first step in learning how to be a cloud architect.
Step-by-Step Guide: Creating Your First Custom VPC
We will use the AWS Management Console for this tutorial. The most efficient way to build a complete VPC is by using the “VPC and more” wizard, which creates all the necessary components in one go.
Step 1: Navigate to the VPC Dashboard
- Log in to your AWS Management Console using your IAM user.
- In the main search bar, type VPC and press Enter.
- Click on the VPC service to go to the VPC Dashboard.
- Ensure you are in your desired AWS Region using the selector in the top-right corner.
Step 2: Launch the “Create VPC” Wizard
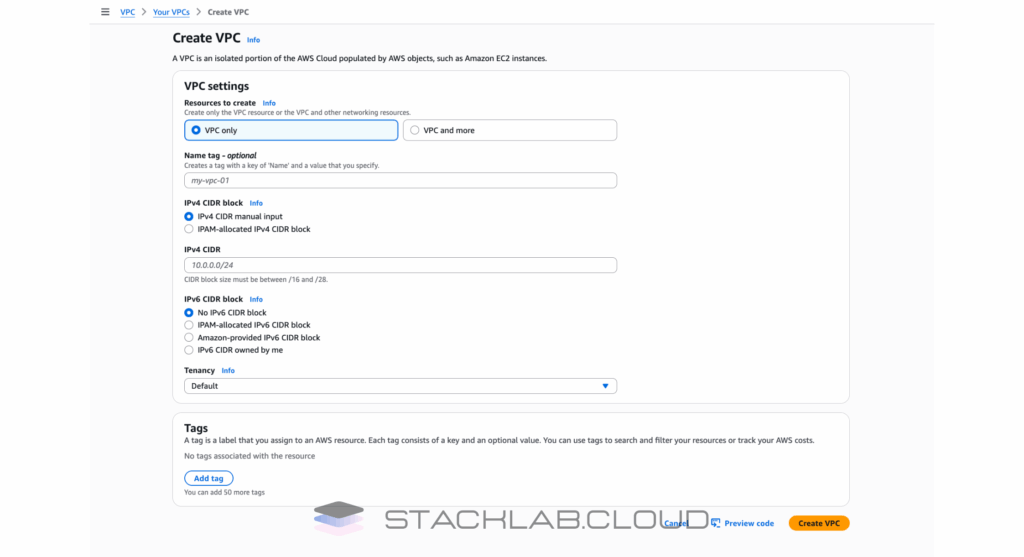
- From the VPC Dashboard, click the prominent orange button that says “Create VPC”.
- You will be presented with two options: “VPC only” and “VPC and more”.
- Select “VPC and more”. This powerful option will create the VPC, subnets, gateways, and route tables all in one logical workflow.
Step 3: Configure Your VPC Settings
This is where we define the core structure of our network.
H3: Naming and IP Address Range
- Name tag auto-generation: Give your project a name, for example,
stacklab-vpc. This will automatically tag all the resources created by the wizard, which is excellent for organization. - IPv4 CIDR block: This defines the main private IP address range for your entire VPC. A standard choice for a flexible network is
10.0.0.0/16. This gives you over 65,000 private IP addresses to work with.
Subnet Configuration
Now we will design the public and private tiers of our network for high availability.
- Number of Availability Zones (AZs): Select 2. This is a best practice for building resilient applications.
- Number of public subnets: Select 2. The wizard will automatically place one public subnet in each of the two AZs.
- Number of private subnets: Select 2. The wizard will also place one private subnet in each AZ.
- Subnet CIDR blocks: You can let the wizard automatically calculate the CIDR blocks for you. It will intelligently divide your main VPC CIDR block among the four subnets.
Gateway Configuration
This section is crucial for internet connectivity.
- NAT gateways: Select “In 1 AZ”. A NAT Gateway allows instances in your private subnets to access the internet for things like software updates, while still preventing the internet from initiating a connection back to them. Creating one in a single AZ is sufficient and cost-effective for most use cases.
- VPC endpoints: For this beginner’s tutorial, select “None”. This is a more advanced feature for connecting to AWS services privately.
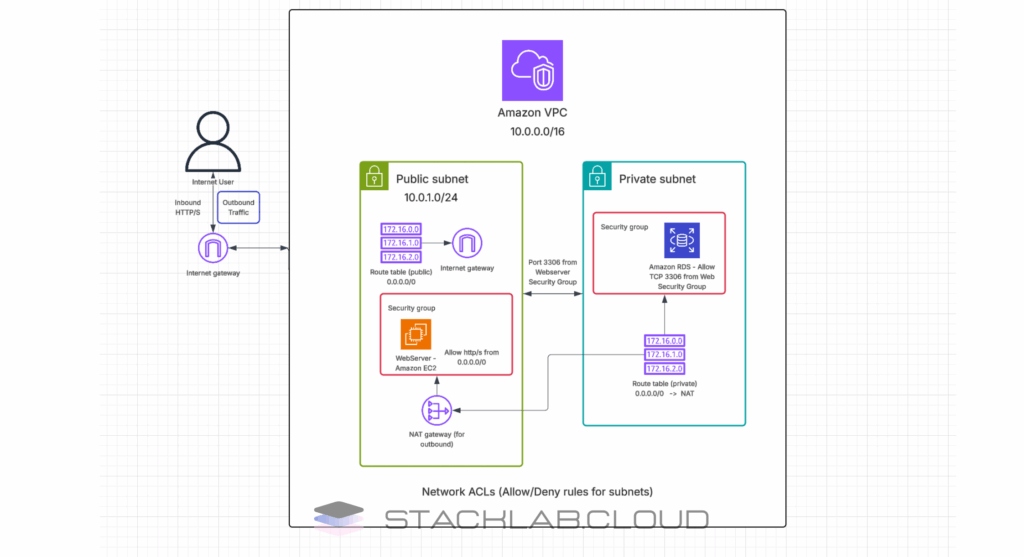
Review the “Preview” diagram on the right. It will show you a live architectural diagram of the exact network you are about to create. This is an incredibly helpful tool to visualize your setup.

Step 4: Create and Verify Your VPC
Once you have reviewed all the settings and the preview diagram, click the orange “Create VPC” button at the bottom.
The wizard will now go to work, provisioning all the resources you defined:
- The VPC itself
- Four subnets (two public, two private)
- An Internet Gateway (for the public subnets)
- A NAT Gateway (for the private subnets)
- Two Route Tables (one public, one private)
This process will take a few minutes. You can monitor the creation progress on the next screen. Once completed, you can click “View VPC” to see all your newly created resources in the dashboard.
Conclusion: Your Secure Cloud Foundation
Congratulations! You now know how to create a VPC in AWS from scratch. By building a network with separate public and private subnets distributed across multiple Availability Zones, you have implemented a professional, secure, and highly available architecture. This custom VPC is the ideal foundation for deploying real-world applications, from web servers in the public subnets to protected databases in the private subnets.
You have mastered one of the most important foundational skills in cloud computing. This knowledge gives you the power to design and build secure network environments for any project you can imagine.
FAQ: Creating an AWS VPC
1. What is the difference between an Internet Gateway and a NAT Gateway?
An Internet Gateway (IGW) allows two-way communication between your VPC and the internet. Resources with a public IP in a subnet routed to the IGW can be reached from the internet. A NAT Gateway allows one-way communication. Resources in a private subnet can send traffic *out* to the internet through the NAT Gateway, but the internet cannot initiate a connection *in* to those resources.
2. Is it expensive to create a VPC?
Creating and using the VPC itself is free. You do not pay for the VPC, subnets, route tables, or the Internet Gateway. However, you are billed on an hourly basis for any NAT Gateway that you provision, and you also pay for the data that is processed through it. VPC Endpoints also have an hourly and data processing cost.
3. Can I add more subnets to my VPC later?
Yes, absolutely. A VPC is flexible. You can add new subnets to your VPC at any time, as long as their CIDR block is within the main CIDR block of the VPC and does not overlap with an existing subnet.


