

You’ve learned what cloud computing is and you understand the theory behind AWS EC2. Now, it’s time to put that knowledge into practice and launch your very first virtual server in the cloud.
This guide will walk you through every single step of launching a Linux-based EC2 instance using the AWS Management Console. We will be using the AWS Free Tier, so you can follow along and build real-world skills without spending any money. By the end of this tutorial, you will have a running virtual server in the cloud that you can access from anywhere.
Prerequisites
Before you begin, you will need one thing:
- An AWS Account: If you don’t have one yet, you’ll need to sign up. Make sure to follow a guide on how to create your account securely.
Let’s get started.
Step 1: Navigate to the EC2 Dashboard
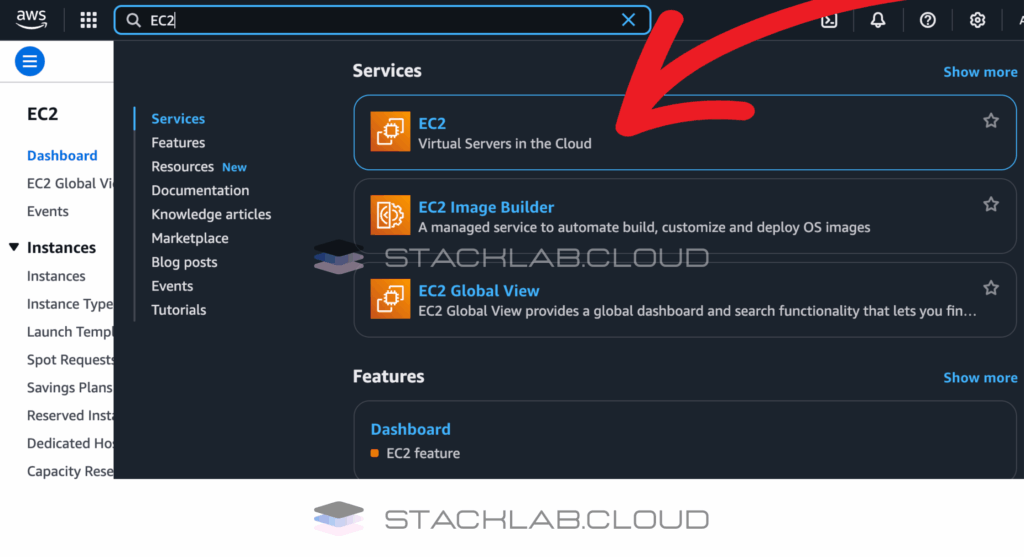
First, log in to your AWS Management Console. The console is the main web dashboard where you will manage all your AWS services.
- Once you are logged in, you will see a search bar at the top of the page.
- Type “EC2” into the search bar.
- Click on the EC2 service in the search results.
This will take you to the main EC2 Dashboard.
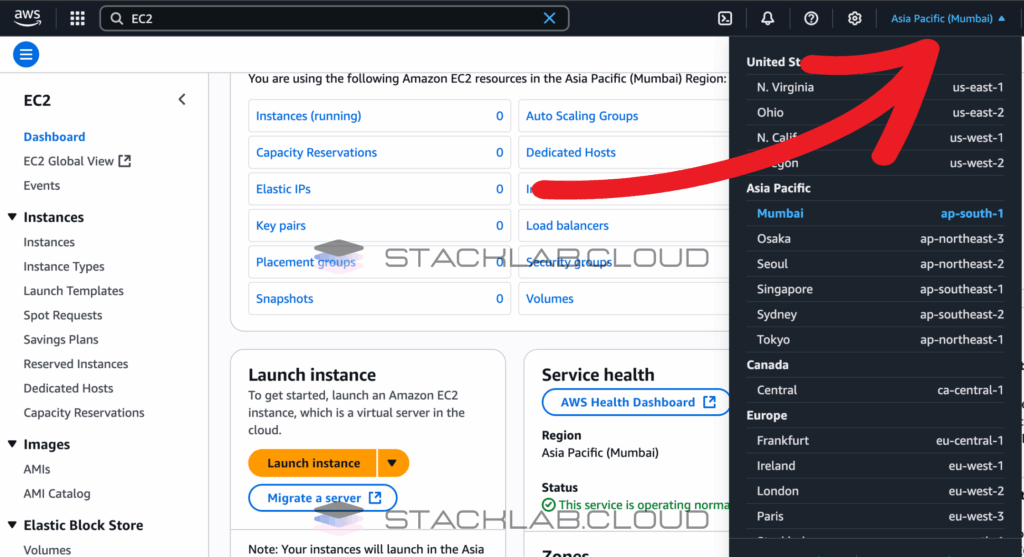
Step 2: Choose Your AWS Region
In the top-right corner of the EC2 Dashboard, you will see a dropdown menu with a region name (e.g., “US East (N. Virginia)”). An AWS Region is a specific geographic location where AWS hosts its data centers.
For best performance, you should choose the region that is geographically closest to you or your users. For this tutorial, any region will work.
Key Rule: The closer the server to your end-user’s country, the lowest will be the ping or latency.
Step 3: Launch a New Instance
Now for the main event.
- From the EC2 Dashboard, find and click the prominent orange button that says “Launch instance”.
This will take you to the main launch wizard where you will configure your new virtual server.
Step 4: Name Your Instance and Choose an AMI
The first section is for naming your server and choosing its operating system.
- Name: In the “Name” field, give your server a memorable name, like
My-First-Web-Server. - Amazon Machine Image (AMI): This is where you choose your operating system. For this guide, select “Amazon Linux”. Make sure the one you choose has the “Free tier eligible” label next to it. Amazon Linux is a secure and stable version of Linux provided and maintained by AWS.
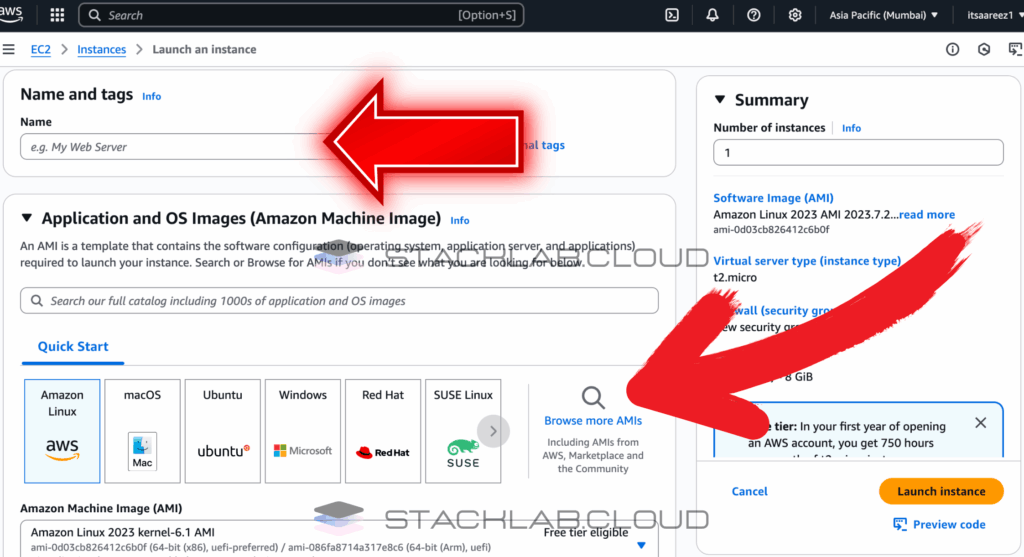
Step 5: Choose an Instance Type
Next, you’ll choose the hardware for your server.
- Instance type: Scroll down to this section.
- Select
t2.microfrom the dropdown list. This instance type is part of the AWS Free Tier and provides enough power (1 vCPU and 1 GiB of memory) for learning and small projects. Ensure you see the “Free tier eligible” label.
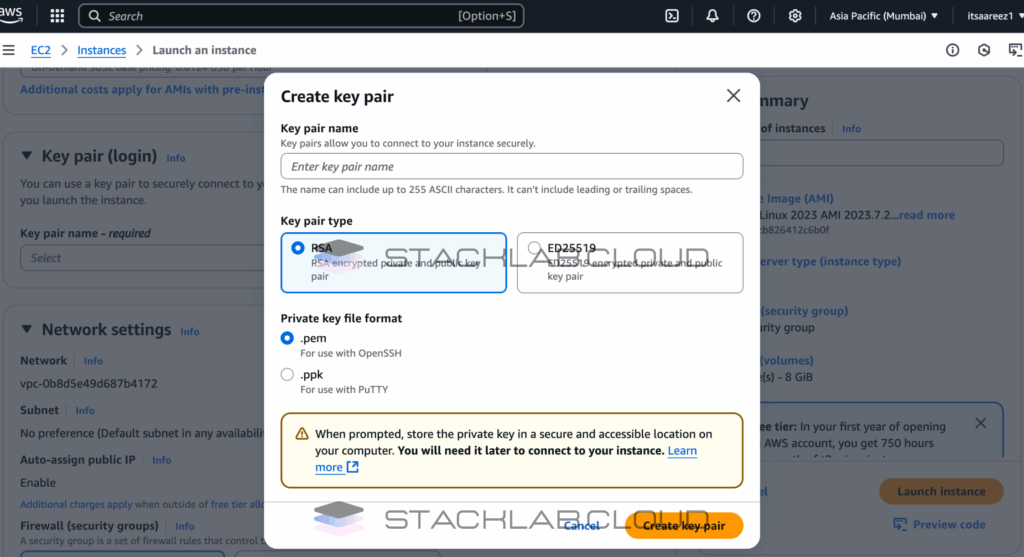
Step 6: Create a Key Pair for Secure Login
This is a critical security step. You will use a key pair, not a password, to log in to your Linux server.
- Key pair (login): Find this section.
- Click the “Create new key pair” button.
- A pop-up window will appear.
- Key pair name: Give it a name, like
my-aws-key. - Key pair type: Leave it as
RSA. - Private key file format: Select
.pem. This is the format needed for connecting from macOS or Linux.
- Key pair name: Give it a name, like
- Click “Create key pair”.
- Your browser will automatically download the private key file (
my-aws-key.pem). This is the only time you will be able to download this file. Store it in a very safe and secure location on your computer. If you lose it, you will not be able to log in to your instance.
Step 7: Configure Network Settings
This step creates the virtual firewall for your instance.
- Network settings: Find this section and click the “Edit” button.
- Firewall (security groups): Select “Create security group”.
- Security group name: Give it a descriptive name, like
web-server-sg. - Inbound security groups rules: By default, AWS will have created a rule to allow SSH traffic. This is what allows you to log in. Make sure the rule has:
- Type:
SSH - Source type:
My IP. This is a security best practice. It means only your current computer’s IP address will be allowed to connect.
- Type:
- For now, you can leave the rest of the settings as they are.

Step 8: Launch Your Instance!
You are now ready to launch.
- On the right-hand side, review the “Summary” box. It should confirm you are using a
t2.microinstance and that it’s within the free tier. - Click the orange “Launch instance” button.
You will see a success screen. It will take a minute or two for your new virtual server to boot up and become fully operational.
Conclusion
Congratulations! You have successfully launched your very first virtual server in the AWS cloud. You’ve learned how to configure the core components of an EC2 instance, including its operating system, hardware, and security.
This running instance is the foundational building block for hosting websites, running applications, and building any number of projects. Your next step is to learn how to securely connect to it.


